1. Get your Firebase copy
Head over to the iOS Getting Started page, scroll to the bottom and click on the "framework SDK zip" link to download an archive containing all the Firebase frameworks.
Please leave a comment if the link is not valid anymore, and I'll make sure to update the guide with the new location.
I've said frameworks, using the plural, because as you'll see once you'll extract the archive, the SDK comes in a number of focused frameworks. In fact, Firebase offer a number of services, analytics, "realtime" database, notifications, etc... and the team has done a great job into providing a framework for each service, so that developers can mix and match without having to carry extra code they don't need with them.
You'll also notice that the archive comes with a README. The file contains barebone instructions to setup the SDK manually, this post augments them.
2. Copy Firebase/Analytics into your project
The analytics component of Firebase is required for the SDK to work.
That might sound weird but is quite obvious, what did you think that Google would provide such a wonderful suite of tools that you can use for free, at least at the start, without getting something out of it?
In the archive you just extracted you'll find a folder called
Analytics. It contains the Firebase Analytics framework and a number of others that are used by it.
Copy the folder in your project's folder.
I would suggest creating a
Firbase or Frameworks folder into the root of your project where we'll put all the frameworks and files required by the SDK.
Simply having the frameworks in the same folder as your project doesn't mean you can use them. The next steps will make the frameworks available to your code.
3. Link the analytics framework into your project
Every guide or screencast I've seen suggest to drag and drop files into the Xcode project navigator tab to import them. I don't like dragging and dropping stuff around, not sure why but it feels sloppy to me 😳.
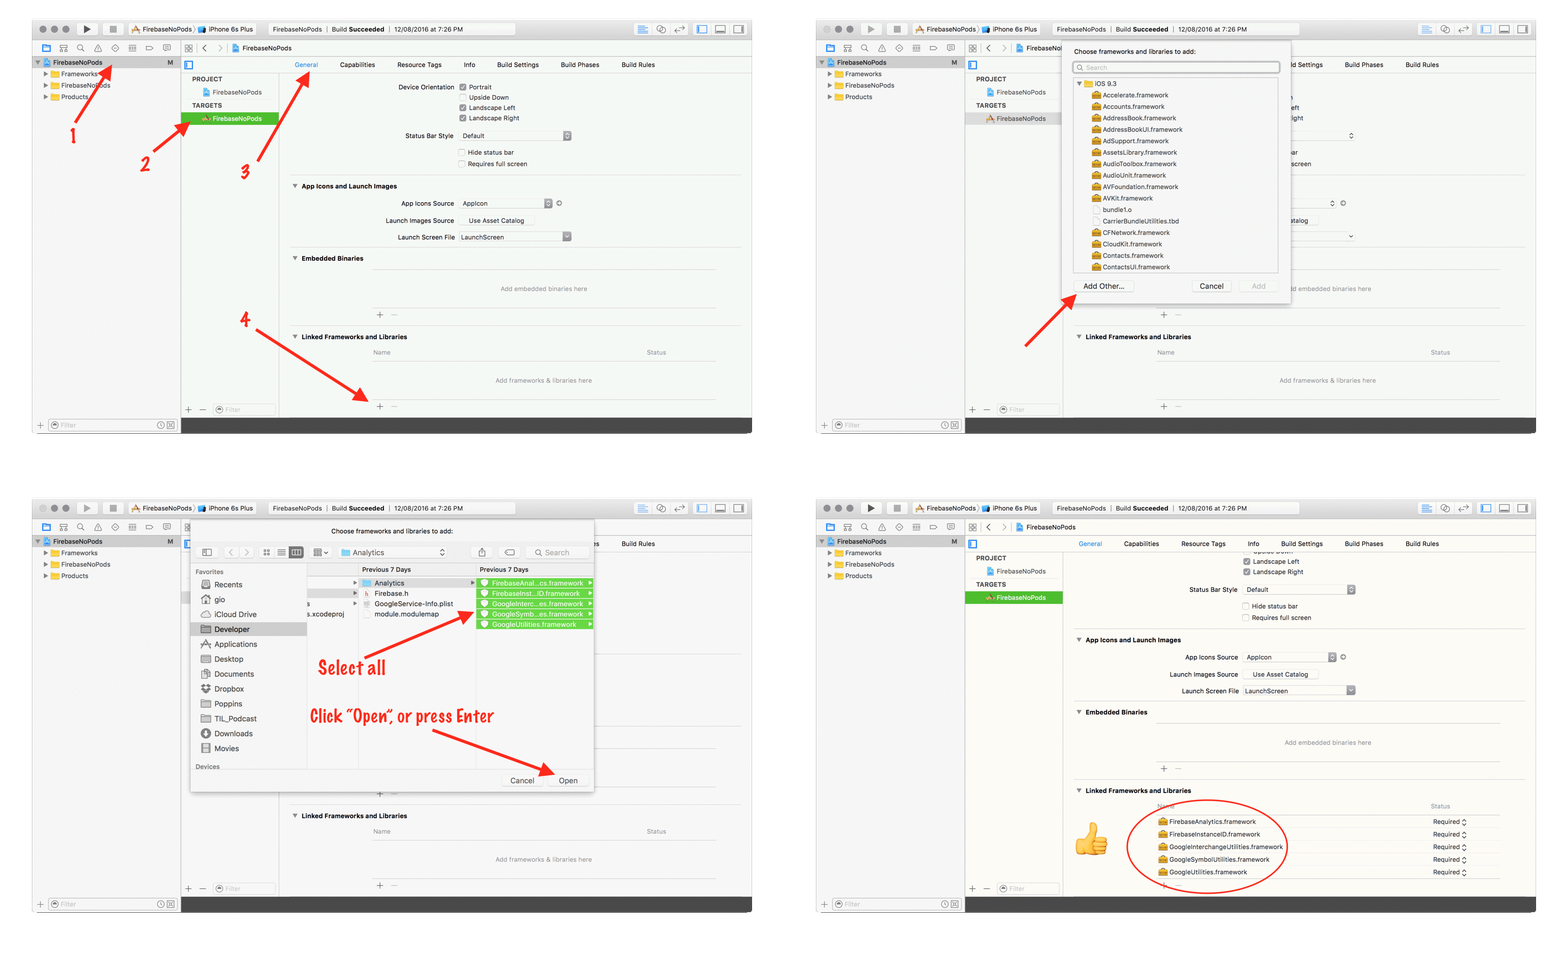
The way I like to use to import and link frameworks into Xcode 7 and 8 projects is to:
- Select the project file in the navigator
- Select your app's target
- Go to the general tab and scroll to the bottom to the "Linked Frameworks and Libraries" section
- Click the "+" button at the bottom
- Click "Add others" in the selection window that will appear
- Use the Finder window that opened to navigate into the location inside your project's folder where you copied the frameworks, select all of them and click "OK", or press enter
- Now your framework have been imported and linked to your project
Because of understandable reasons the Firebase SDK is not distributed as a dynamic framework but as a static one, which means that we can't just embed it after having linked it to have it working. We have another bit of setup left.
4. Import the Firebase header
In the downloaded archive you'll find a file called
Firebase.h, copy it into the Firebase folder you created in your project.
Again just having a file in the same folder as the project doesn't mean that Xcode will see it.
To import a file into the project without drag-n-drop:
- Go to the project navigator tab
- Select the group where you want to add your project
- Click the "+" button in the bottom left corner
- Select "Add files to YourProjectName"
- Use the Finder window that opened to navigate to the location of your file
- Select the file and press "OK"
5. Add the -ObjC linker flag
As mentioned above the SDK is distributed as a static Objective-C framework, and as such itrequires the
-ObjC linker flag.
Go to your target's "Build Settings" and then into the "Linking" section and add
-ObjC in the "Other Linker Flags" row.
You can use the search bar in the top right corner to filter the build settings, saving a lot of scrolling time.
6. Add Firebase.h to the projects bridging header (Swift only)
The way to make Objective-C code visible to Swift is via a bridging header.
If your project doesn't have one already, the best way I found to make have Xcode add a bridging header is to add a dummy Objective-C class and select "Create Bridging Header" in the prompt that will be presented.
Once you have your bridging header, import the Firebase header in it like this:
#import "Firebase.h"
7. Import the module map file (Swift only)
To use the Firebase SDK into a Swift project the header is not enough, we also need the Swift module map file.
Go into the downloaded Firebase folder and you'll find a
module.modulemap file. Copy it into your project and import it as you did for the header.8. Import the Firebase configuration .plist
We're almost done. The project is now configured to link and import Firebase, but we're missing its configuration.
Like other services provider with an SDK, Google uses a convenient
.plist file to store its configurations.
If such file is not part of the project the Firebase SDK will throw a runtime error, crashing the app, in order to prevent us from attempting to use it without proper configuration.
This configuration file is generated for you in the Firebase console when you create a new project, and the select "Add firebase to your iOS app".
The process will download the file for you. Once again, copy the file in your project's folder, and add it to the Xcode project.
9. Start using Firebase
This is it. To verify your setup is complete and start using Firebase, import the framework and call the Firebase singleton initialization method.
For example in the
AppDelegate:import UIKit
import Firebase
@UIApplicationMain
class AppDelegate: UIResponder, UIApplicationDelegate {
var window: UIWindow?
func application(application: UIApplication, didFinishLaunchingWithOptions launchOptions: [NSObject: AnyObject]?) -> Bool {
FIRApp.configure()
return true
}
}
10. Add more frameworks
You probably are not interested in Firebase just for its analytics.
To add any other component simply:
- Find its folder in the archive
- Copy it into the project's
Firebasefolder - Link the frameworks like you did in step 3
Comments
Post a Comment